Saturday, January 26, 2013

Free and easy bag


Another item in the Gingko leaves collection! This time made a bag from a fabric painted by me. I decided to give the bag a natural look so I used all natural looking materials like unbleached cotton, naked leather, and felt. You can paint any figure on the bag to make it completely unique and personal!

Materials

2 pieces of unbleached cotton, size: 36 x 49 cm
2 pieces of felt, size: size: 36 x 49 cm
2 leather straps, size: 2,5 x 57 cm
Black fabric paint ( I used Dylon paint) & paint brush

Method

1. Take one of the cotton pieces and paint any figure on it you want with the fabric paint.


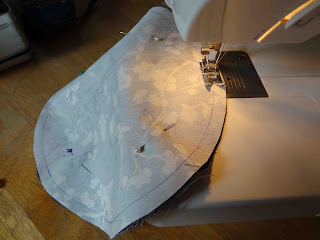
2. After the paint got dry place the other cotton piece on top onto the right side and make a seam along the sides and the bottom.
Fold the 2 bottom corners in a triangle and make sure that the seams match in the center (see picture). Make a seam around 3 cm from the tip of the triangle.


3. This is how the results looks like.


4. Fold the bag inside out and stitch the 2 leather straps 4 cm from the top.


5. Stitch the ends of the leather straps onto the fabric with a seam in a squared shape. (If the leather is not too thick you can just use any sewing machine with an ordinary needle)


6. Take the 2 felt pieces and make a seam along both sides. Slide the felt bag over the cotton bag until the edges at the top match.


7. Make a seam all around the top edge. Make sure the straps are pushed down so they don't interfere with the seam.


8. Make a seam along the bottom edge of the felt bag. Make sure that the cotton bag is pushed far inside the felt bag so it doesn't interfere with the seam. Close the bottom except for the center.


9. Fold the bottom corners in a triangular shape (around the same size as you did for the cotton piece) and make a seam 3cm from the triangle tip.


10. Pull the felt bag inside out over the cotton bag. Close the gap in the bottom of the felt bag. Then push the felt bag inside the cotton bag. Finally  make a seam along the top edge so the felt lining stays nicely inside. You are done!

Sunday, January 13, 2013

Passport pouch with Gingko leaves


This weekend I made a passport pouch. I was looking for one in the shop but they all look so boring. Especially the skin colored ones. So I made a fashionable one that you can comfortably hang around you shoulder when moving around on the airport and go through the security checks.

Materials

2 pieces of felt 16 x 26 cm (for the outer part)
2 pieces of cotton 16 x 26 cm (for the outer part)
1 piece of felt 12 x 26 cm (for the inner pocket)
1 piece of felt 70 x 3 cm (for the shoulder strap)
Optional: 2 pieces of cotton 16 x 26 cm (for the lining)
1 zipper 20 cm
Iron-on adhesive tape 

Method

1. Cut all the fabric pieces. Cut out the inner shape for the 2 felt rectangular pieces.


2. Fold the shoulder strap and stitch over the edge


3. Put some iron-on adhesive tape along the inner edges of the large (16 x 26) rectangular felt piece and place the cotton piece (outer part) on top. Iron over the cotton side (Don't iron on the felt side. It will stick to your iron!) and make a seam along the edge. The front piece is done.

Repeat the same steps for the other felt and cotton piece to create the back piece.


4. Sew the should strap onto the front piece.


5. Put the back piece on top and sew 4cm over the top edge on both ends


6. Fold the piece open and place the zipper behind. Sew along the zipper edge on both sides


7. If you want you can put some lining on the inner side. Then place the small rectangular felt piece on the inner side and align the bottom edge to the bottom edge of the back. Sew along the bottom and side edges.

Put the 2 sides of the bag against each other. The right sides facing each other. And make a seam along the bottom and side edge. To avoid ruffles make 2nd zic-zac seam along the edges. Fold the bag inside out and your are done!

Wednesday, December 12, 2012

Glamorous Roses


Are you looking for some accessories for your Christmas party? These roses will make everything look glamorous. You can put it on your shoes, make a broche with it, make a ring with it, decorate your bag, etc. 
The roses are really easy to make it takes about 15 minutes.

Materials:

  • Spare leather pieces
  • Double sided tape


Method:

1. Cut various sizes of leaves out of leather. The 2 smallest sizes can be connected together so it will be easier to roll them up later.


2. Heat up the edges with a flame to make them curl. The bottom side will get a little bit burned but that is fine


3. Put some double sided tape on the first 2 leaves...

4. And then roll them up.


5. Put some double sided tape on the 3rd leave and roll it around the first 2 leaves. Continue these steps until all the leaves are finished.


Another type of flower:

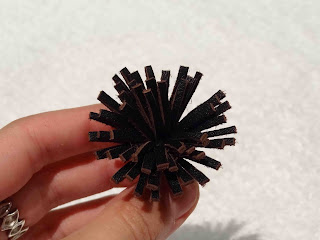
1. Cut a leather strip and make little cuts over the whole length. Put some double sided tape on top.


2. Roll up the strip until its finished.


3. You are done! Another flower!

Monday, December 10, 2012

Brigitte Bardot Skirt


This weekend I designed a skirt inspired by Brigitte Bardot's 'Breton Stipes'. I really love these black and white stripes. It matches with any uni-color top. For this skirt I used a high quality Japanese cotton fabric. I placed the pattern in different directions on the fabric to create a cool effect. It takes a few hours to make this skirt. Be warned, you get a bit dizzy looking at the stripes while cutting the fabric :)!

Brigitte Bardot

Materials

1.5 meters of striped cotton
1 zipper, 10 cm

Method

1. Cut 4 skirt pieces, 2 for the front and 2 for the back. Make sure to put them in the correct angle on the fabric. I used an angle of 30 degrees. 2 Pieces will have the stripes come down from the right and 2 pieces will have the stripes come down from the left.


2. Cut the 4 waste band pieces. Place the pattern on the fabric in such a way that the stripes are in a horizontal direction.


3. Put the 2 front pieces on the top of each other, right sides facing each other. Stitch over the center line. Fold the front piece open and you will see the stripes coming together in a v-shape in the center. The front piece is done.

Repeat the same steps for the back piece.


4. Put the front and back piece on top of each other, the right sides facing each other, and stitch them together over the left side.

Repeat the same steps for the other 2 waste band pieces.


5. Place the front and back piece of the skirt on top of each other and stitch them together over the left side.

6. Place the waste band piece on top of the skirt piece along the top edge, the right sides facing each other. The long side of the waste band should be aligned to the top edge of the skirt. Pin the 2 pieces together. Make sure that the seam of the waste band piece is aligned with the seam of the skirt. Then stitch 1cm from the edge.

7. Now place the other waste band piece on top of the waste band attached to the skirt. The right sides are facing each other. Stitch along the top edge. Fold the piece inside. I used some heat n' bond iron-on adhesive to make the waste band piece stay in place inside the skirt.

8. Fold the skirt inside out and stitch along the right edge until 10cm from the top. Insert the zipper and you are done!

Tuesday, November 13, 2012

Leather Dragonfly


Today I made these dragonflies with leather. They can be used as a fashion accessory. For example as a brooch on a jacket or as a decoration for a belt buckle. Personally I like leather material best for these dragonflies but felt could be used as well.

Materials

  • Little pieces of leather, 2 different colors (use leather for the wings that has been dyed on the back as well because this side will be visible)
  • Pin
  • Leather glue

Method

1. Cut out the 2 pieces for the wings and the 2 pieces for the body and head


2. Put leather glue on the wrong side of the body piece, let it dry for a few minutes, and then roll it up. Repeat the steps for the head piece


3. Put leather glue on the right side of the wing piece in the center. Let it dry for a few minutes and press it together with a peg.


4. After waiting for 1/2 hour remove the peg from the wings and glue them together


5. Put some glue on the end for the head and body piece and glue it to the wings. 


6. Press a needle trough the head, wings and body to make it stay together.


7. If you want it use it as a brooch, glue a pin on the back.

Monday, October 22, 2012

Mister Piggy


Meet my new friend, Mister Piggy! Use some spare fabrics to make this little piglet. It takes about 1 hour.

Materials

2 circles for the body: 22cm
2 circles for the head: 16cm
4 circles for the eyes: 3.5cm and 2cm
2 circles for the nostrils: 2.5cm
1 piece for the snout
1 ribbon for the tail: 10cm
Stuffing

Method

1. Cut out the fabric pieces


2. Put the 2 big circles on top of each other. The right sides should face each other. Stitch along the edge. Keep about 5cm open at the bottom.


3. Fold the piece inside out and stuff it with the filling.


4. Hand sew the bottom opening. The body part is done!


5. Stitch the 2 big circles for the eyes and the snout on the face.


6. Stitch the 2 small circles on the eyes and the nostrils on the snout.


7. Place the 2 ear pieces (pink & grey) on top of each other, the right sides facing each other. Stitch along the edge but keep the bottom side open. Make little cuts along the curved side but be careful to not cut through the seam. Fold the ear inside out. Repeat the same steps for the other ear.


8. Place the ear pieces on top of the face and stitch them along the side.


9. Place the grey back piece on top of the face, the right sides facing each other. Stitch along the edge. Keep about 5cm open at the bottom.


10. Make some little cuts along the edge. Turn the head inside out. Stuff it like you did for the body piece and close it by hand. Stitch the head piece on top of the body piece. Add a tail on the back and you are done!