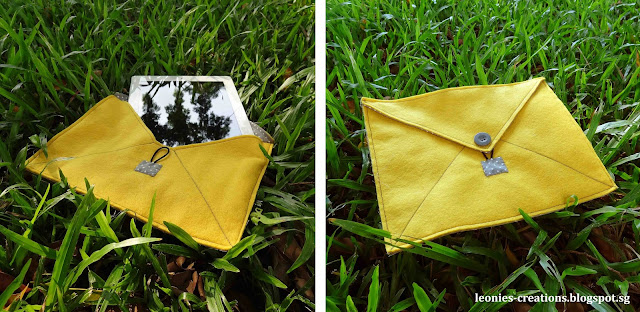
Today I made this sleeve in the shape of an envelope. This example is made for an iPad but you can also make it larger so it can be used for a laptop, or make it smaller for a smart phone. Whatever you like!
The iPad sleeve is made from soft felt and cotton with polka dots. I like the combination of bright yellow and grey. It took me about 1.5 hours to make it.
Materials:
2 rectangular pieces, 1 felt, 1 cotton, size: 26 x 21 cm (make the cotton piece slightly larger)
2 triangular pieces, 1 felt, 1 cotton, size: (see picture below, follow the dotted line when cutting the material)
2 pieces for the front-bottom, 1 felt, 1 cotton, size: (see picture below, follow the dotted line when cutting the material)
1 square piece of cotton, size: 4 x 4 cm
1 piece of elastic, size: 12 cm
1 button
1 piece of elastic, size: 12 cm
1 button
front-bottom triangular flap
Method:
 2. Stitch the triangular cotton piece onto the felt piece over the 2 short edges. Leave the top edge open.
 3. Repeat the same steps for the front-bottom piece. Fold the 3 edges of the v-shape side inside with the printed side of the fabric down. Make 2 cuts in the corner so that it will fold nicely. The same you can do for the 2 top corners so you can nicely follow the rounded corners.
 4. Stitch the cotton piece onto the felt piece over the 3 edges of the v-shape (the sides and bottom are left open). Make also a seam from the 2 bottom corners to the center so it looks like a real envelope. Trim the edges of the grey cotton so it doesn't protrude under the yellow felt anymore.
 5. Next, place the grey cotton back piece onto the yellow felt back piece. Then take the front-bottom piece and pin it on top. Make a seam along the sides and bottom edge.
  7. Fold edges of the little square cotton inside and stitch it over the elastic cord endings. (I hand stitched it because it was difficult to reach inside the sleeve. But actually it is easier to take this step when the front piece is not attached to the back and you can use the sewing machine)
8. Last, stitch the button on the triangular flap and stitch the flap onto the sleeve. You are done!


Oh, deze vind ik dan weer heel leuk! Leuk dat je langskwam op mijn blog. Tot een volgende keer!!
ReplyDeleteJo